Canoeing the Clearfield Creek

Canoeing Clearfield Creek Madera to Faunce

Canoeing Clearfield Creek

If you’re a paddler from the Clearfield or Cambria Counties in Central Pennsylvania you’ve probably paddled the Clearfield Creek, but what’s interesting is that many paddlers haven’t heard of the Clearfield Creek because it’s often referred to as the Madera Creek, Faunce Creek, or the Glen Hope Creek, and occasionally confused with the Little Clearfield Creek.

The Clearfield Creek is popular because it’s one of the few paddling opportunities in the Clearfield and Cambria County region. The headwaters begin near Ashville, just above the Prince Gallitzin State Park, and the creek flows through many small towns such as Coalport, Irvona, Glenhope and Madera before meeting the West Branch of the Susquehanna near Clearfield, Pennsylvania. The creek is also fed by many tributaries, the largest feeder is the Glendale Dam at Prince Gallitzin State Park.

In a region of few creeks and rivers, and a paddling season that often ends by mid June, this creek offers a fun class 1 paddling experience, with a few fun riffles and obstacles here and there, it’s perfect for a short relaxing day trip; however, during times of flooding this tame creek does carry a strong current that could pose a problem to the inexperienced or unaware paddler.

There are several popular paddling sections on the Clearfield Creek.

  • Dysart to Coalport – 2-4 Hours
  • Glen Hope to Madera – 3-6 Hours
  • Madera to Faunce – 3-5  Hours
  • Madera to Dimeling Bridge 6-8 Hours

While it’s entirely possible to do an extended trip from Coalport to Madera, Madera to Clearfield, or even Irvona to Clearfield, this creek is best paddled as a short day tripper. The most popular sections of this creek are Glen Hope to Madera, and Madera to Faunce.

Clearfield Creek Glen Hope to Madera

Glen Hope to Madera

Glen Hope to Madera

This is the longer trip at six to eight hours of paddling depending on the speed of the current and how much playing around you do. It’s also a flatwater section that some of the locals avoid due to its slower current, but it’s popular for 1st time solo paddlers or younger paddlers in recreational kayaks. And as you can see in the photo there are interesting places to get out and explore. Keep your eyes open for a beach on river left that used to be the location of the Lions Club swimming hole. The swimming hole was closed in the early 1970s but you can still see remnants of the concession stands that once occupied the area. And if you are into canoe camping there are a few places to pitch a tent, although there are no established campsites. Also be aware that most of the property along this creek is private property, so tread lightly.
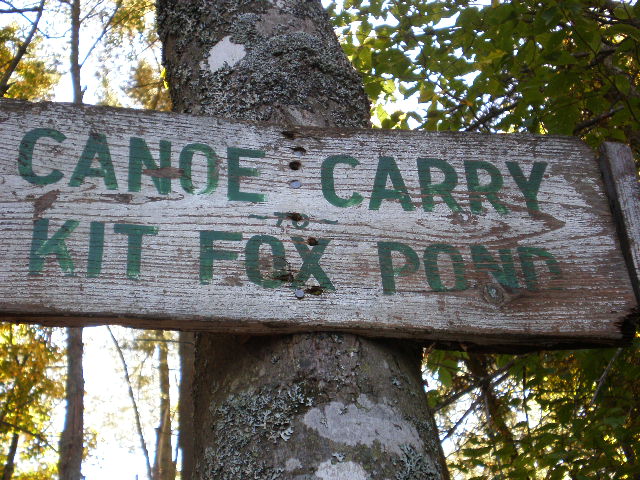
Kellytown Bridge

Kellytown Bridge

Madera to Faunce

This is the most popular section because of its faster current and it’s winding path through some of Clearfield County’s remote woods. On this twisty section you’ll enjoy a slightly faster current, occasional obstacles and fun riffles and eddies, and you’ll enjoy some of Central PA’s scenic views that take you past remote villages and few campsites. And if you look closely you’ll see evidence of early homes, industry, and even a once major travel route during the 1800s that eventually succumbed to time.

Canoeing Madera to Faunce

Canoeing Madera to Faunce

I recently read an Internet article written by a paddler who claimed the Clearfield Creek was a pristine river flowing through remote Pennsylvania wilderness. Well, this creek is far from that. Although it does carry you through remote areas of Clearfield County, it is far from being truly remote. During your canoe trip don’t be surprised if you encounter groups of four-wheelers, dirt bikes, or even a group of good ol’ boys target shooting on a Saturday afternoon. And one thing you will not encounter are fisherman, because the majority of this creek is not pristine and you’ll see much evidence of that when you paddle past the multiple acid drainages seeping into the creek.

Directions and Shuttle –

Paddling the section Glen Hope to Madera is an easy shuttle because the creek winds back and forth parallel to PA – 53 N, from Glen Hope to Madera. You can begin your canoe trip at the Caldwell Memorial Park and end your trip at the old Madera ball field where you will find plenty of parking. Your shuttle on this trip will not take longer that 20 minutes, just drive PA-53 N from Glen Hope to Madera and turn into the ball field on the right side just before you cross the bridge in Madera.

On the section Madera to Faunce the vehicle shuttle is slightly off the beaten path. You’ll unload you canoes at the Madera ball field and begin your shuttle up PA- 53 N, then to PA-453, then left to Sanbourn Rd,  then onto Faunce Rd. You’ll park your vehicles at the Faunce bridge where you’ll be exiting your canoe on the river left.

I’ve created a Google Map for you.


View Larger Map

The water lever of this creek can rise and drop quickly, and the best time to canoe it is during the spring; however, you will find that it’s sometimes possible to paddle after a hard rain during the dry seasons or during occasional releases from the Glendale Dam.

Camping on this creek is very limited, and on some sections nonexistent, so I’d suggest not camping as you will certainly be pitching your tent on private property.

http://waterdata.usgs.gov/usa/nwis/uv?01541500

Canoeing Glen Hope to Madera

Canoeing Glen Hope to Madera

Posted in Canoeing Pennsylvania | 3 Comments

Becky Mason does the Sculling Draw Stroke

The sculling draw stroke is well known in the kayaking community but for some reason not as many canoeists practice the stroke, or even know it exists. But the sculling draw stroke is one of my favorite paddling strokes because it’s a lot of fun to try to master and allows greater turning and handling of the canoe once you begin to master it. I’ve spent hours at the lake trying to craft this stroke into something that I can actually use but I can only get it right after several attempts, it doesn’t come natural to me. It’s a great stroke that effectively propels your canoe or kayak sideways, but it’s a sensitive stroke that requires nearly perfect paddle placement while carving an elongated figure eight paddle movement parallel to the canoe gunwale while switching the power face of the blade from bow to stern.

Watch Becky Mason make this stroke look so easy.

Posted in Canoeing Basics | Leave a comment

Bannock Recipes – The Truth About Bannock

Testing this content

So you think bannock is a great campfire recipe, but have you ever actually tried bannock? If you go to Youtube you will find dozens of bannock video recipes. You can learn how to cook bannock on a camping stove, on a hot rock, and even on a stick, and each video states the bannock is so delicious. I even provided some of those bannock videos on this website. But I must tell you that bannock is one of the most disgusting camping foods I ever ate. Not only is traditional bannock completely tasteless, it also sits in your belly like a stone for about a day.

For experimental purposes I revised my bannock recipe so that it’sBannock Hotdog Roll not so disgusting.  I tried wrapping a hotdog in bannock and baking it in a real oven. It didn’t turn out so great but I think it may have potential with some work, but I won’t pursuit if any further. I tried mixing cinnamon and dried cranberries with my bannock, this was a slight improvement, but very slight. Finally I mixed raisins, cinnamon, and honey in my bannock, and it turned out decent – sort of.

Here is my cinnamon, honey and raisin bannock recipe –

3-4 cups of flour (this recipe requires more flour due to the additional ingredients)

1 tsp of cinnamon

1 tsp of honey

1/2 cup of raisins

1 tbs of sugar

2 tbs of baking powder

1/2 tsp of sale

1 tsp canola oil (optional)

2 cups water

Mix 3 cups of flour and all remaining dry ingredients in bowl, slowly add water and stir gently until thoroughly mixed. Add remaining wet ingredients, i.e., honey and canola oil. Due to all the extra ingredients your mix may require additional flour. Once thoroughly mixed knead the dough mixture for several minutes, flatten out a bit but do not roll flat, this is already a very dense, heavy bread.

You can choose your own method of cooking but I suggest cooking your bannock in a greased pan in an oven, dutch oven or something other than on a hot rock or on the end of a stick.

Enjoy!

Posted in Camping Recipes | Leave a comment

Important Factors in Choosing Your Hiking Boots

old-hiking-bootsSelecting your hiking boots could be a difficult proposition, because there are so many types of hiking boots available, each with distinct disadvantages and advantages. Some are made for light day hiking, some are made for backpacking with heavy loads on your back, and still others are constructed to endure heavy duty mountaineering. The key to choosing the right boot is knowing what type of hiking you are going to do.

And just because it’s an expensive pair of boots doesn’t mean it’s the right pair of boots. By following these simple tips and instructions you can find a great pair of hiking boots that perform well, and with no surprises once the trail gets tough.

Durability

One consideration in your boot purchase is durability. Hiking can put a strain on any type of footwear, even the sturdiest pair of boots can seem to give way on technical trails, and the worst thing that can happen to you during a hike is the breakdown of your hiking boots. Look for a pair of boots that has decent durability. Basic options are full-grain leather, split-grain leather, and modern polyester and nylon materials.

These construction material all have their advantages:

  • Synthetic materials like nylon and polyester have superior drying characteristics and break in easier, but they do wear out quicker.
  • Full grain leather is very durable, water resistant, superior resistance to punctures,  but they are heavier, more expensive,  and often have a longer break-in period.
  • Split-leather boots are usually combined with synthetic materials. They are lighter than full-grain leather, and also less expensive, however they don’t have the waterproofing characteristics of full-grain leather.

Boot Style

Yes, hiking boots come in different styles, and choosing the right style is important, e.g., low-cut shoes, mid-cut boots, and high-cut boots.

  • Low-cut shoes are generally acceptable for short day hikes without heavy backpack loads. Although they give your feet more freedom and ankle flexibility, they often expose your feet to dirt, mud, limbs, and small rocks.  Choose a low-cut boot like this for maintained trail hiking, such as local state park hiking trails.
  • Mid-cut boots are generally the boot of choice for shorter multi-day backpacking trip because they offer superior ankle support and are lighter than the high-cut boots, and they provide better protection from rocks and other potential obstacles. They also offer greater support than low-cut shoes do for your backpacking loads.
  • High-cut boots are specifically designed for rough mountain trails and off-the-trail backpacking. They provide  the greatest ankle support for heavier backpack loads. These boots are also more expensive than the low-cut and mid-cut boots.

Comfort

Comfort becomes obviously more important during longer hikes,  because we can all endure a little discomfort for a few hours. Always take the time to try on any pair of hiking boots before purchasing them. I don’t recommend buying boots online, but sometimes you can get a great discount or coupon code that will save you 10% – 25% online. So if you are going to order online be sure to go to a dealer beforehand and try on a new pair. Walk around in them for a while to determine their comfort and support. For an added test, carry a backpack filled with some gear. I recommend at least 30 minutes with the boot on – if the store will permit- yeah, that’s kind of disgusting. The full weight of your backpack will change the boots comfort and stability of the hiking boots performance.

Weather Temperature

Consider the environment temperature that you will be hiking in – this is one of the most miscalculated issues when shopping for hiking boots . You may need a vented pair of hiking boots if hiking in warmer weather, and require very little to no ventilation on cooler days. A friend of mine researched his $200 hiking boots before making the purchase, but when  he went hiking in July his feet sweat so bad the boots became loose and he got severe blisters anyhow.  Don’t make that mistake, and if you are hiking in different environments you may have to consider more than one pair of boots.

Trip Length

You need to also consider how long and how technical your trips are. You may be able to get away with buying a less expensive pair of boots if your hikes are shorter and less technical.  But if you are going on lengthy or technical trips a higher quality boot is necessary.

And like I mentioned earlier, you may be better off to purchase two pairs of lesser expensive medium quality boots that are suitable for different environments rather than purchasing one pair of high quality boots that are only suitable for one environment.

By following these very simple tips you help to ensure a comfortable trip without strain or pain.

Happy Hiking!

Posted in Backpacking & Hiking Basics | 1 Comment

Freeze Dried Survival Food Options Perfect for Camping and Backpacking

Dehydrated Foods for Backpacking and campingBuilding a freeze dried survival food supply is a smart idea for people living in areas that are exposed to natural disasters such as hurricane, tornado and flooding. Often after a natural disaster it can be weeks or even months before efforts even begin to restore utilities, and in some cases precious supplies like clean water supplies may take months or years to clear up. During this time it’s important your family has a supply of food and water for self reliant survival. But freeze dried food isn’t just for emergency survival situations. It’s works very well for camping and backpacking meals too.

For the best selection and prices on bulk freeze dried food consider making your purchase from Wise Foods.

Freeze Dried Food for Camping and Backpacking

One of the most convenient ways to start your freeze dried survival food supply is byFreeze Dried Food for Camping and Backpacking purchasing freeze dried food in bulk. Not only is it easy and cost effective but it’s also easy to store, lasting up to seven years on average. But freeze dried food isn’t just for emergency survival situations. It’s also perfect for camping and backpacking trips because it is compact, lightweight, easy to prepare, and most meals are packed with energy to help keep you going on the trail.

Wise Foods is an industry leading provider of  freeze dried meals. Their freeze dried camping and backpacking meals come in individual 10 ounce servings. These meals are jumbo sized so you don’t have to worry about cooking up a second meal to satisfy your appetite like with those 4 ounce meals. And they are easy to prepare just by adding hot water and waiting for several minutes. Each 12 ounce meal provides about 900 calories. 

Also at Wise Foods you can purchase you bulk food in larger storage containers like the 56 Serving Breakfast and Entree option that will feed several campers or backpackers for a longer duration, or you can purchase the meals by the individual packet if you are only an occasional tripper. But what I like about purchasing the freeze dried meals in bulk is that you will have them on hand as you need them and you won’t have to go on a major shopping trip each time you decide to go camping or backpacking.

Whether you are building a survival supply or just supplying your camping and backpacking trips I suggest giving Wise Foods freeze dried meals a try. Check out their variety of meal options below. You can’t beat the variety, taste and convenience.

Listed below are Wise Food meal choices.

Breakfast Choices
Honey Glazed Granola
Brown Sugar Oatmeal
Multi-Grain Cereal

Lunch & Dinner Meal Choices
Stroganoff
Cheesy Macaroni
Chicken ala King
Creamy Chicken Pasta
Creamy Potato Soup
Chicken Teriyaki
Cheesy Lasagna
Beef Teriyaki and Rice
Southwest Beans and Rice
Creamy Tomato Basil Soup

For more information about emergency survival food supply visit Emergency Food Suppliers.

Posted in Backpacking & Hiking Basics, Camping Basics, Survival Basics | Tagged , , , | Leave a comment

The Difference Between Canoeing and Kayaking – The Very Basics

Family Canoe TripCanoeing and kayaking are two outdoor activities enjoyed by many outdoor enthusiasts but while there are many similarities between the two activities they can also be worlds apart and plenty of preparation is required before doing either. The equipment needed and what type paddling are the first considerations.

Recreational purposes are what canoes are used for today. There are different categories of canoes, and most of these apply to kayaking also. The categories are whitewater, touring, and recreational.

Whitewater paddling consists of maneuvering your canoe down sections of a river that has high concentrations of rapids. This type is not for the faint of heart. Although some canoes perform well in whitewater they do not move as freely through the rapids as a kayak does; however, the kayak can be more technical and steeper learning curve . Canoes are typically more stabile than kayaks to a certain point then the kayaks begin to have the stability advantage in more extreme whitewater.

Touring can be done by way of canoeing or kayaking. This is done through calmer water which provides an opportunuty to enjoy the environment around you rather than focus on paddling though whitewater. Recreational canoeing or kayaking ususlly occurs on lakes for slow moving rivers and is generally less dangerous that whitewater paddling.

One of the great things about canoeing or kayaking is paddling to a campsite that can only be reached by water trail. Using a canoe to get you to your campsite provides you the means to transport more camping equipment while using a kayak to transport your camping gear is slightly more technical and has it’s limits on gear volume.

When canoeing and kayaking a very important piece of equipment required is a life jacket. Helmets are only required for whitewater canoeing and kayaking. A wet suit is recommended to help keep you dry in cooler weather conditions. Packing food is obviously recommended for the extra energy but it can also turn your trip into an enjoyable picnic along the waters edge.

While canoeing and kayaking are a lot of fun the most important thing to remember about paddling canoes and kayaks is to know your skill level and stay within it.

Canoeing photo courtesy of Explore The Bruce and Flickr.

Posted in Canoeing Basics, Kayaking Basics | Leave a comment

Getting Started in Canoe Fishing

Canoe FishingNot only is canoe fishing a relaxing hobby, but it also offers advantages such as the ability to quietly meander through difficult to reach areas without frightening game fish. Having the right canoe can maximize your canoe fishing experience. Comfort, versatility, stability, and the ability to maneuver through your desired destination are among the most important features in a fishing canoe.

For the solo fisher, Old Town offers the Pack Angler canoe. At 33 pounds, this canoe’s light weight makes loading, unloading, and transport easy. The Pack Angler’s weight is attributed to Royalex, the light, yet highly durable material of which it is made. Navigating through the tightest waters is easy for this 12 foot canoe. For comfort and added stability, the Pack Angler canoe comes with a lowered contoured seat with adjustable backrest.

Another solo fishing canoe offered by Old Town is the Predator C133. It is a modified version of the popular Predator canoe that has been shortened for enhanced maneuverability. The Predator C133 has a bow-mounted anchor system, and it also accommodates side motor mounts.

For family fishing trips, Old Town also offers the Saranac 146 Angler Canoe. This canoe paddles betters than most recreational canoes, and it has more built-in conveniences for the avid fisher. The interior of the Saranac 146 Angler edition has two contoured seats and an additional bench seat with storage, as well as molded-in upholders at the bow, center, and stern and molded-in storage trays. The family-sized fishing canoe also features molded-in rod holders at the bow and center, molded-in paddle rests at the bow and stern, and a bow-mounted anchor system.

Mad River also offers the Angler 14, a quick, 14 foot canoe that is suitable for the calmer waters of lakes and ponds. While this canoe is not particularly suited for travel-intensive canoeing expeditions, the Angler 14 is very well-suited for sportsmen. This canoe is also made of Royalex and provides insulation from cold water. If you are new to canoe fishing and just beginning to learn to paddle, the Angler 14 is extremely stable and allows for a learning curve. This makes the Angler 14 excellent for children who are new to canoe fishing. Mad River offers the Angler 14 with a choice of either an aluminum gunwale or a new vinyl option.

As you can see, when getting started in the sport of canoe fishing, one must consider several factors. Where will you be fishing? What comfort features are important to you? Will you be fishing alone or with friends or family? Will you be canoe fishing with children? Manufacturers offer many, many options to choose from when selecting a proper canoe, and each of these elements will factor into deciding on the fishing canoe that best fits your needs.

Canoe Fishing on Long Pond photo courtesy of Mr TGT on Flickr.

Posted in Canoeing Basics | Leave a comment

Canoeing and Camping the Boundary Waters

Canoeing the Boundary Waters

As I plan my canoe trip to the Boundary Waters one of my readers sent me this article she wrote about the Boundary Waters.  

If you are a canoeing or canoe camping enthusiasts, there are few places more perfect than the vast Boundary Waters Canoe Area Wilderness. Founded in 1978, this federally protected wilderness area covers more than 1 million acres, and attracts hundreds of thousands of visitors annually.

The wilderness meets two primary towns. Ely, Minnesota is on the western edge, while Grand Marais touches the east. Each is an excellent launch pad for a wilderness adventure.

The wilderness itself offers a wide range of recreational activities, but if canoeing and camping is what the doctor ordered, tripping to the Boundary Waters is an ideal way to spend a summer vacation. In fact, anyone experienced with canoeing Minnesota would recommend the majestic beauty of the Boundary Waters Canoe Area Wilderness.

Camping Boundary Waters is also a favorite activity among visitors. While you may opt to stay in hotels or lodges in the small towns around the wilderness area, the million acres of virgin wilderness provides ample attraction for those who enjoy a good camping trip. Both the Forest Service and a number of businesses in the nearby towns can assist with outfitting a newcomer for a camping adventure in the Boundary Waters Canoe Area.

Boundary Waters Canoeing

The key to a great trip to the Boundary Waters is planning. The wilderness area has specified entry points, which are accessed via water or hiking. This means planning ahead, and bringing the appropriate gear when setting out on the expedition. The entry points are many miles from the Wilderness Area Office. It’s important for trekkers and paddlers to know long they want to stay for a number of reasons. The first is that these factors will determine the type and quantity of gear to bring. The second is that the intended length of the stay affects which entry point is used, and the distance a group can go.

In order to enter the Boundary Waters at all, it’s necessary to apply for a permit. These can be acquired ahead of time through the Forest Service. The permits are entry point-specific, and a limited number is available for each entry point each day. They also specify whether a visitor plans only day use, or an overnight stay, the duration of the stay, and how many members are in the group (to a maximum of nine).

While canoeing Boundary Waters requires some preparation ahead of time, it’s well worth the foresight. Visitors gain access to some of the most pristine woodland in the United States and countless lakes to paddle. It’s an opportunity for rejuvenation, relaxation, and outdoorsmanship in one of the largest wilderness areas in North America.

Photos courtesy:
http://www.flickr.com/photos/chibijosh/with/39236360/

http://www.flickr.com/photos/chadfennell/

Posted in Canoeing Minnesota | 2 Comments